In Part 1, we deployed OpenClaw on an EC2 instance and connected it to Telegram for communication. Then, in Part 2, we gave it web search, skills, and a daily briefing that runs automatically. At this point, we have an AI agent that can run commands on a server, read content from the internet, and act on a schedule without anyone watching.
That is powerful, and it’s also risky. In Part 1, we followed the easiest way to set things up, not the safest. In this guide, we will fix that. We will check our setup with OpenClaw’s built-in security audit, and make sure only we can talk to the bot, control the commands OpenClaw can run, clear up our API keys, and lock down the EC2 instance.
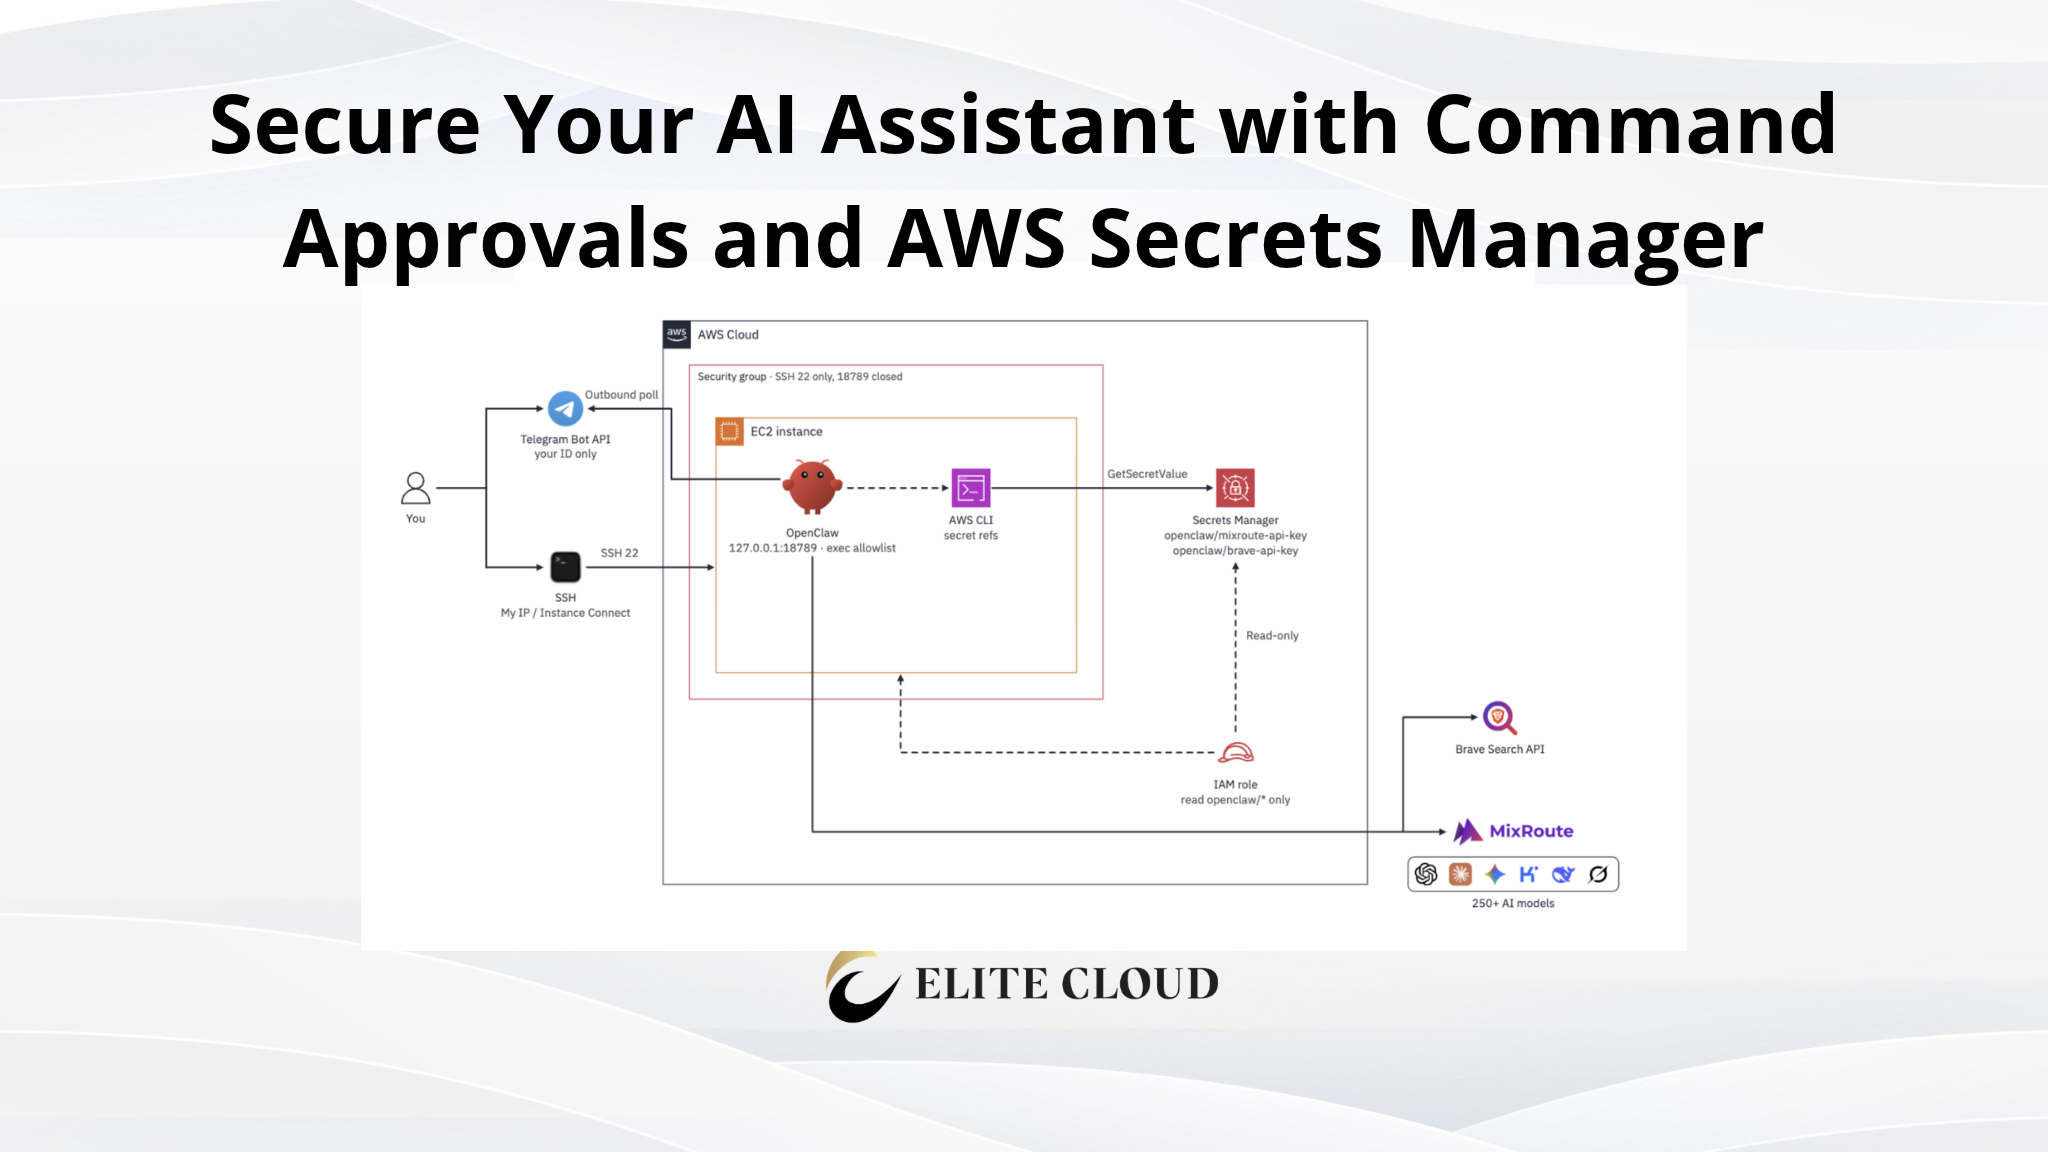
Architecture
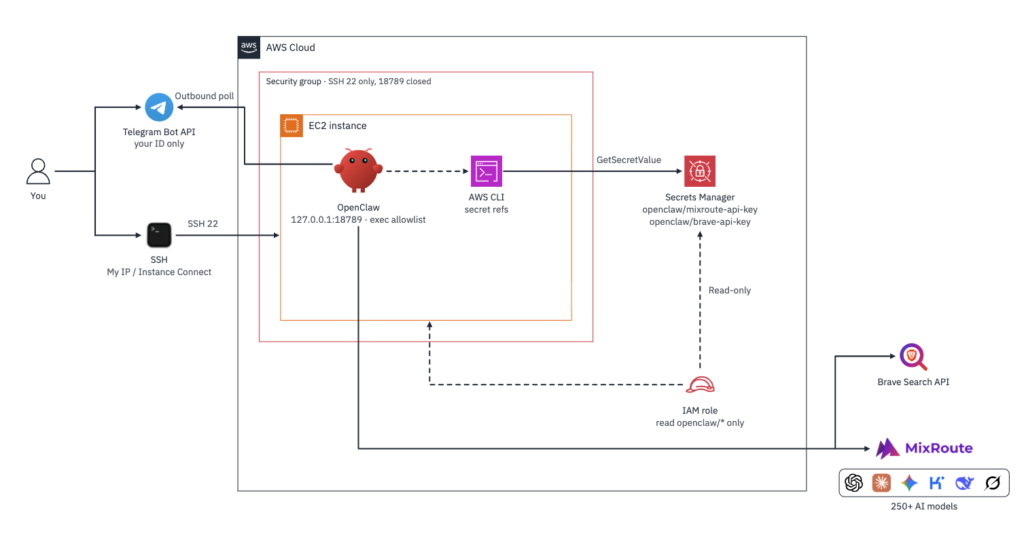
Prerequisites
- The OpenClaw setup from Part 1 and Part 2
- Access to the AWS console for the EC2 instance
- Access to your LLM API provider’s dashboard (to rotate the key)
Step 1: Run the Security Audit
Before making any changes, let’s see where we stand. OpenClaw has a built-in security audit that checks the config, file permissions, channels, and more. Run the command openclaw security audit.
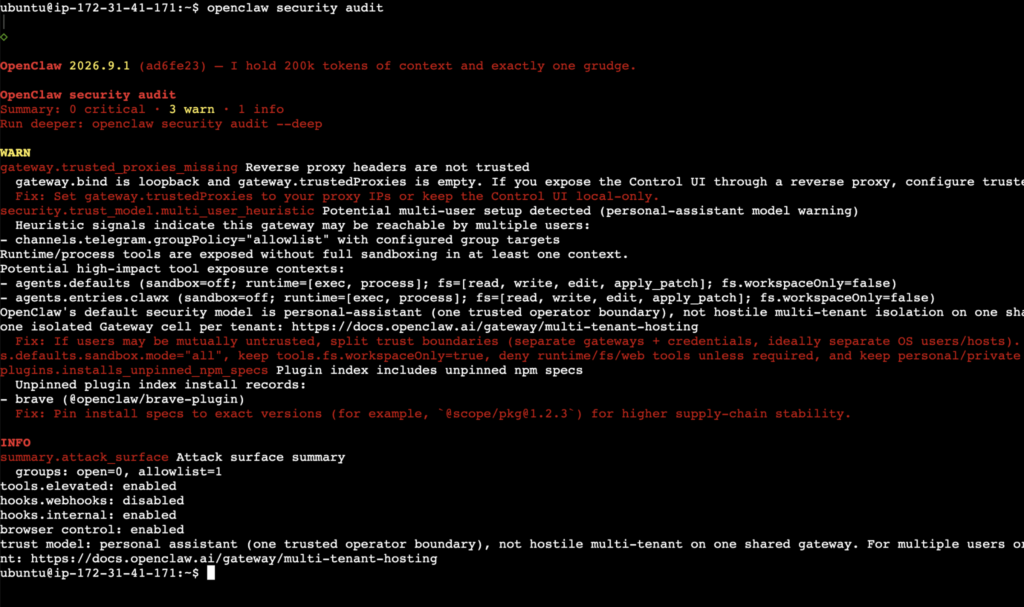
In my case, the summary showed 0 critical, 3 warnings, and 1 info. Now run it again with the --fix option: openclaw security audit --fix, which applies safe auto attic fixes, including tightening file permissions.
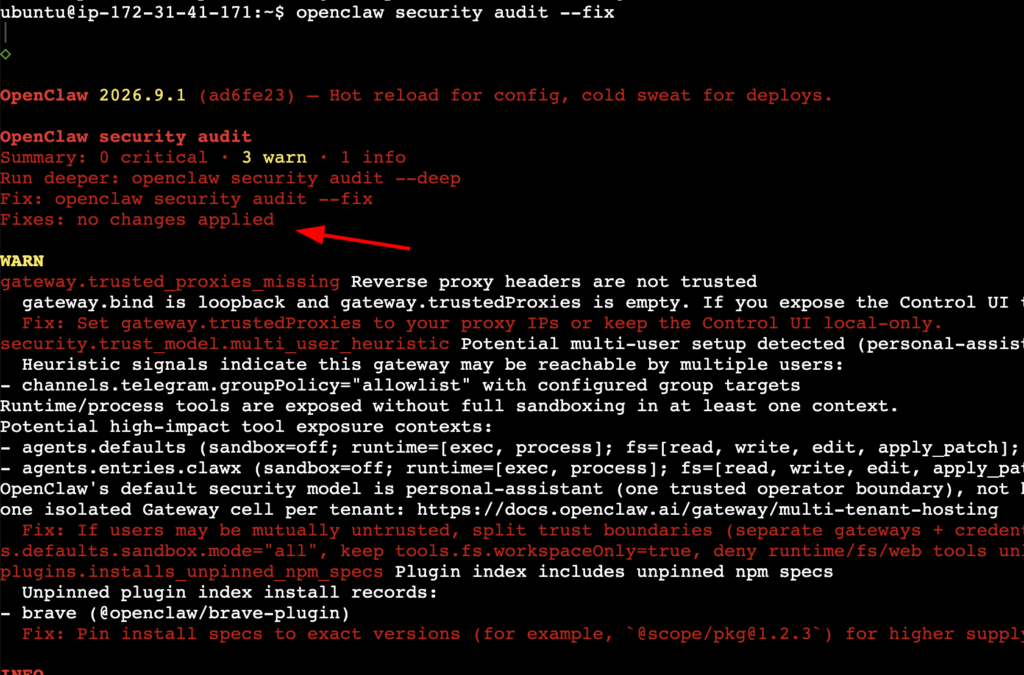
Here, it said “Fixes: no changes applied”, because the installer had already set safe permissions. The warnings are things that the fix command doesn’t do automatically. So let’s check them manually.
Reverse proxy warning
gateway.trusted_proxies_missing only matters if you expose the OpenClaw Control UI through a reverse proxy. Our gateway listens only on the server itself, so we can leave this as it is.
Unpinned plugin
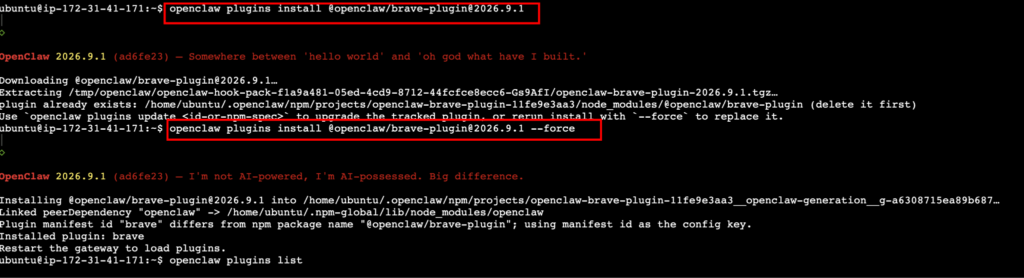
plugins.installs_unpinned_npm_specs means the Brave plugin we added in Part 2 isn’t pinned to a version. Pinning prevents an unexpected update from changing what runs on your server. Check the installed version:
openclaw plugins list

Then pin it to that version by reinstalling it with the exact version number:
openclaw plugins install @openclaw/brave-plugin@<version>
Tool access
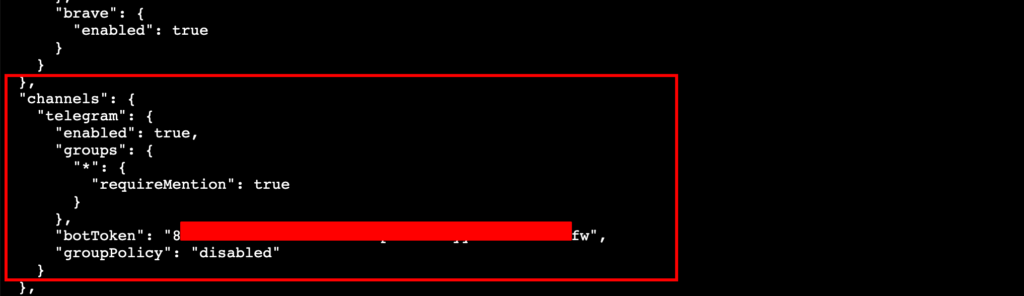
The multi-user warning lists two things. The first is that our Telegram config allows a group. We only use the bot in a private chat, so let’s turn group access off:
openclaw config set channels.telegram.groupPolicy disabled

The second is that OpenClaw’s file tools can read and write anywhere on the server. Let’s limit them to the OpenClaw workspace. Our skills live inside the workspace, so they keep working.
openclaw config set tools.fs.workspaceOnly true

We will also turn off elevated mode. It only matters when OpenClaw runs in a sandbox, which we don’t use, so it adds risk without any benefit.
openclaw config set tools.elevated.enabled false

Restart the gateway to apply the changes:
openclaw gateway restart
Note: The audit also suggests running commands in a sandbox. We won’t do that here, because our server_health skill needs to check the real server, not a container. Instead, we will control which commands OpenClaw can run in Step 3. You can enable it depending on your use case.
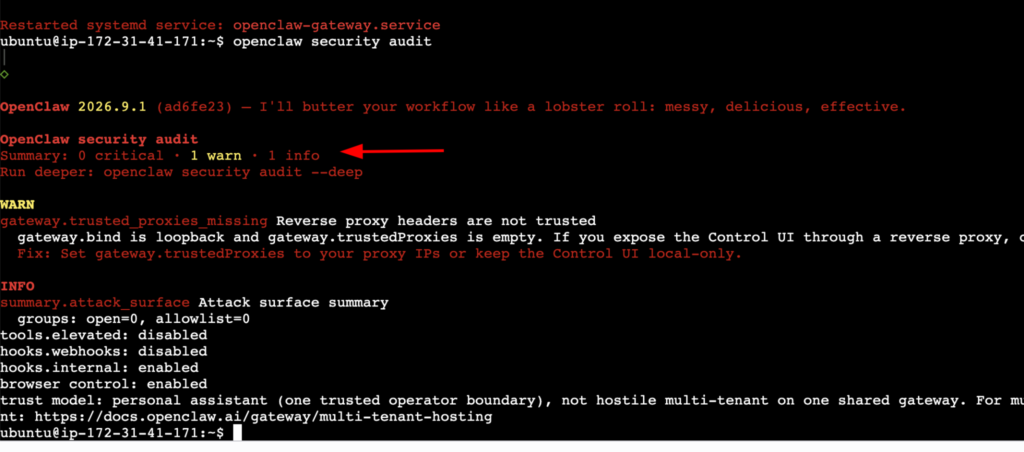
And after running the security audit again, we can see there’s only one warning that’s for the reverse proxy, which is irrelevant to us, since we are using local.
Step 2: Lock Down Telegram Access
The current setup we have will provide a pairing code to anyone who uses the bot. It’s safe until we approve it from the server. But it’s better not to give anyone any access. This also gives a chance to accidentally approve. For a bot that only you will be using, it’s better to set an explicit allowlist in the config. That way, only your Telegram can send commands to the OpenClaw, and the rule stays in the config even after you reinstall.
Now go to this bot, @userinfobot, in Telegram, and it will reply with your ID. This is the same ID we used for the cron job in Part 2.
Now open the config file with vim ~/.openclaw/openclaw.json, and replace the part with the new code.
"channels": {

  "telegram": {

    "enabled": true,

    "botToken": "YOUR_NEW_BOT_TOKEN",

    "dmPolicy": "allowlist",

    "allowFrom": ["12341234"],

    "groupPolicy": "disabled"

  }

},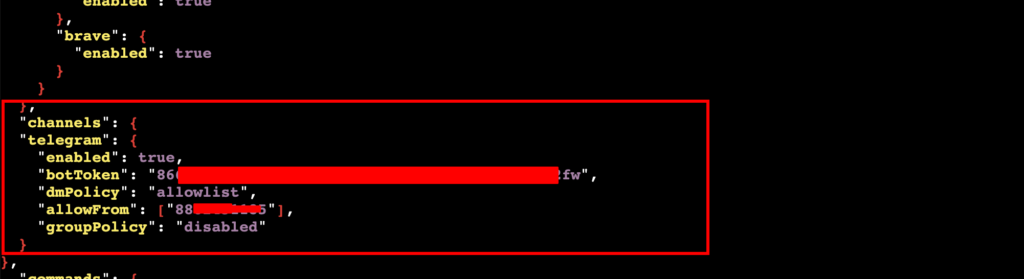
The config says that only the user ID specified in the “allowFrom” can access the Telegram bot.
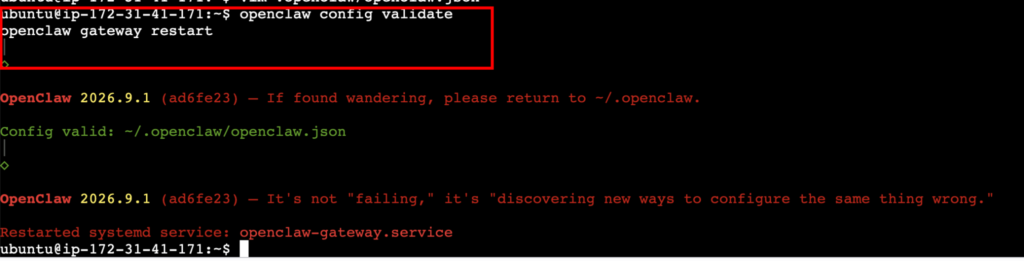
After saving this, validate the config with openclaw config validate and restart with openclaw gateway restart.
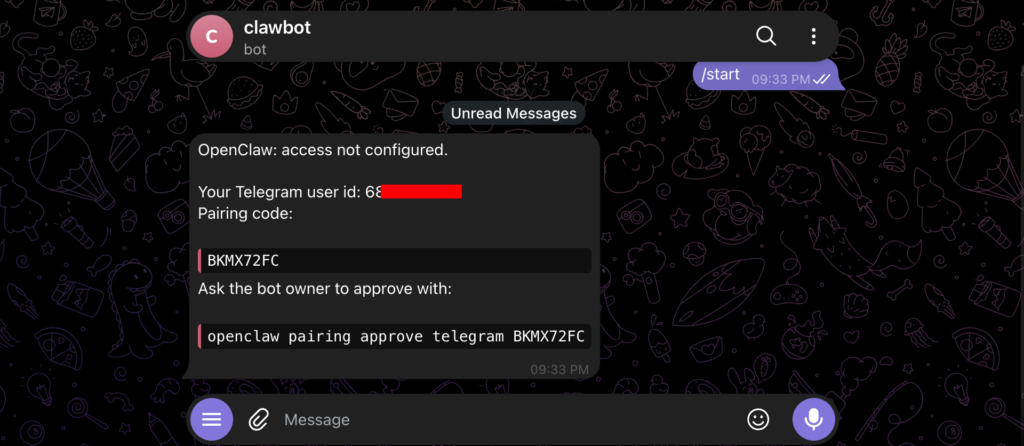
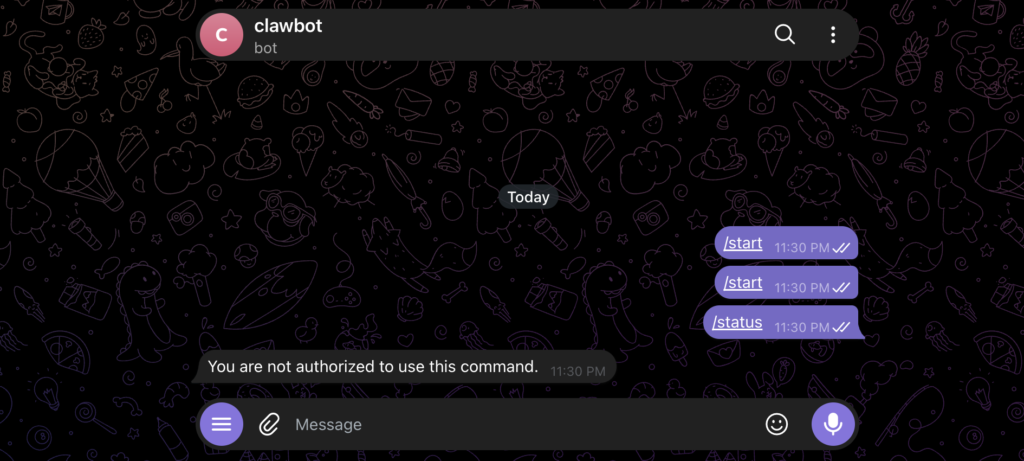
Here is a before-and-after of the change.
Before, it showed the pairing code.
After the changes, it’s getting ignored.
Note: Never set dmPolicy to “open” for a personal bot. Anyone who finds your bot’s username could then send commands to a server you control.
Step 3: Control What Commands OpenClaw Can Run
Right now, OpenClaw can run any command on the server when it decides it needs to. That is what makes our skills work, but this also means a bad prompt, or malicious text on a web page it reads, could make it run something we didn’t intend.
Run the command openclaw exec-policy show to see the current exec approval policy.
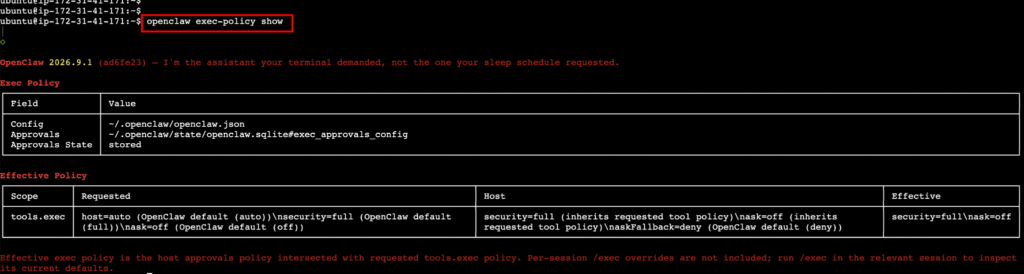
This shows the “security=full and ask=off” in the effective column. That means OpenClaw can run any command, and it never asks you first.
Now apply the command openclaw exec-policy preset cautious for the built-in preset. With this, OpenClaw can only run the commands that are on the allowlist, and for any other command it needs user approval. If no one approves, it will be auto-denied.
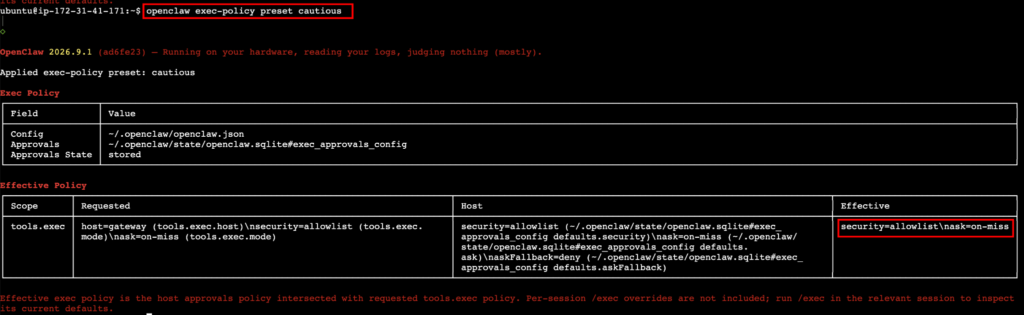
Because of this change, we need to approve our daily briefing. And without approval, it won’t execute anything. That’s why we need to put it in the allowlist. Our briefing uses two skills:
- The weather skill, which uses
curl - Our server_health skill, which runs
uptime,free,df.
Now add them to the allowlist using the following commands.
openclaw approvals allowlist add “/usr/bin/uptime”
openclaw approvals allowlist add “/usr/bin/free”
openclaw approvals allowlist add “/usr/bin/df”
openclaw approvals allowlist add “/usr/bin/curl”
Then use the command openclaw approvals get to check the list.
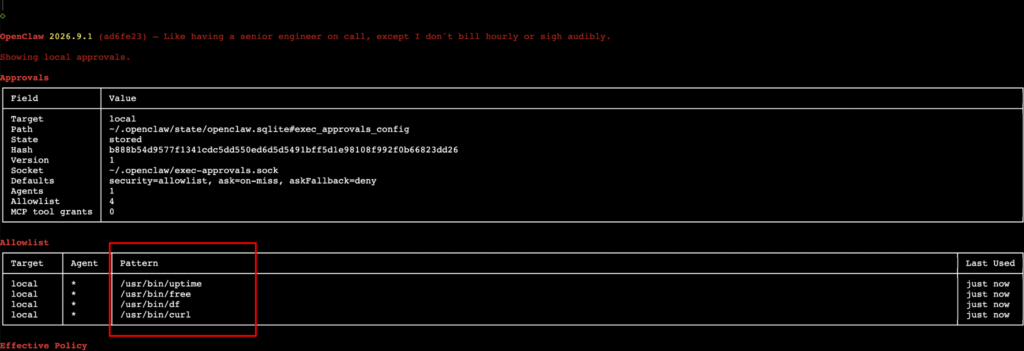
Note: Only allowlist commands that OpenClaw can’t modify. A script inside the OpenClaw workspace is a bad candidate, because OpenClaw can edit files there. It could change the script, and the changed script would still run without approval.
Now restart the gateway with openclaw gateway restart and confirm if the skills are still working as expected.
“How is my server doing? And what’s the weather in Taipei?“
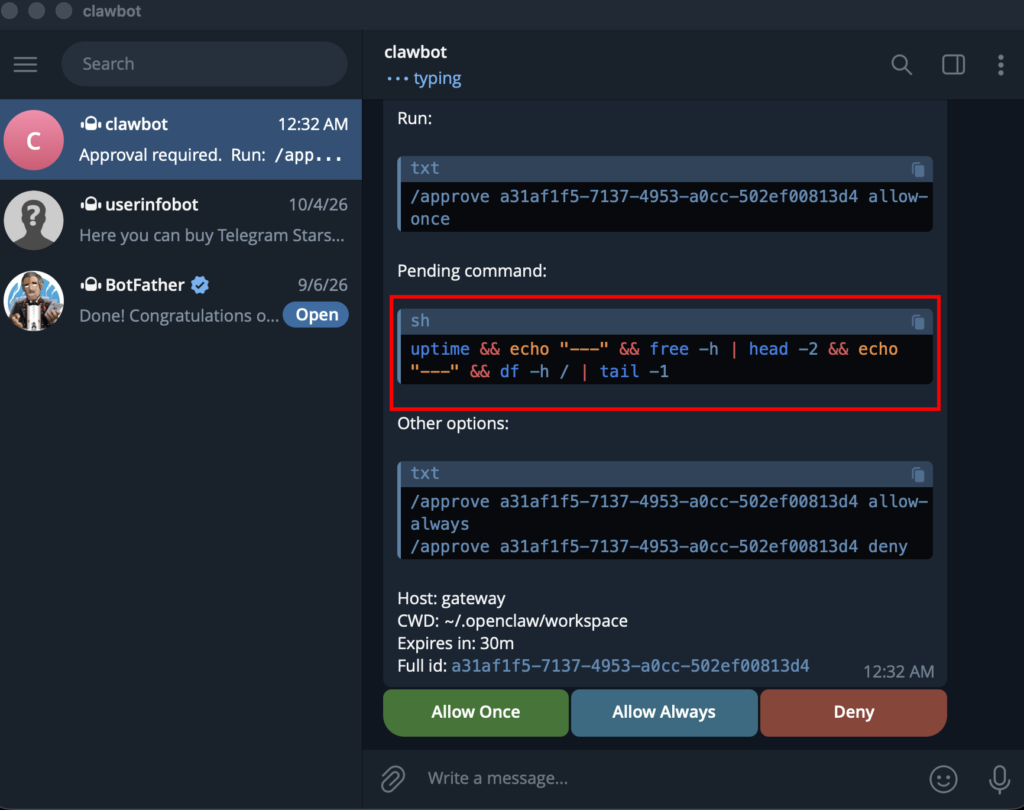
Ok, it still requires us to approve. This is because it combined the commands using && and |. Because here every part of the chained command must be on the allowlist. So, here we also have to add the echo command with openclaw approvals allowlist add "/usr/bin/echo".
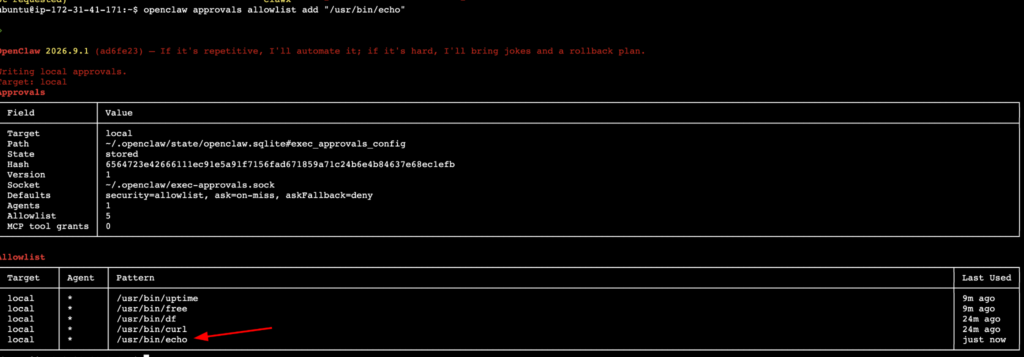
We could’ve also allowed it from Telegram by clicking “Allow Always”.
Now let’s see if it runs.
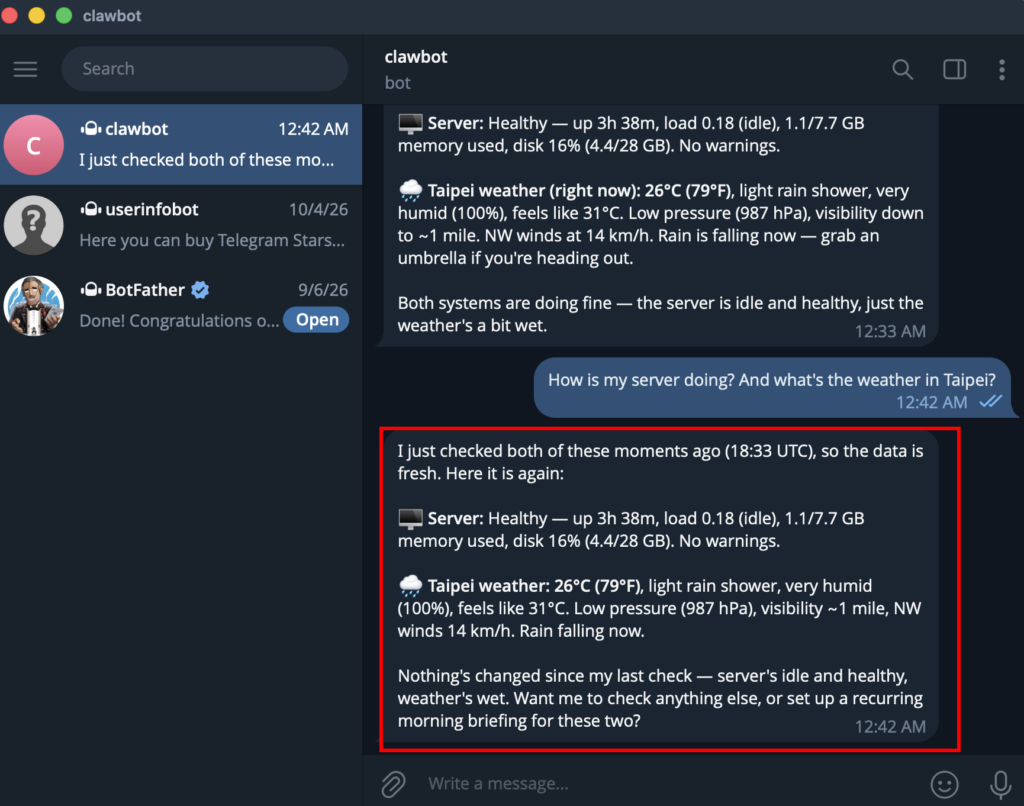
The command is running as expected without any approval.
Now whenever you have something new, you can just preapprove it. Or approve it when the command runs. Do this yourself for the briefing, if you haven’t removed that.
Step 4: Move Your API Keys to AWS Secrets Manager
Right now, our API keys are stored in plain text in ~/.openclaw.env. Anyone (or anything) that can read that file can read the keys, and so can any backup or snapshot of the server.
To make it more secure, we will move the keys to AWS Secrets Manager. We will do this using OpenClaw secret references; instead of writing a key in the config, we write a reference to it, and OpenClaw fetches the real value when it starts.
The setup works like this:
- The keys live in AWS Secrets Manager.
- The EC2 instance gets an IAM role that can read only those keys.
Clean up the shell history
In Part 1, we typed the API key directly into the CLI. Anything we type in the terminal is saved in ~/.bash_history, so the key is sitting there in plain text. Lets remove it first.
sed -i '/MIXROUTE_API_KEY/d' ~/.bash_history
history -c

But since the key was stored in plain text, it’s best to rotate it with a new key. Now go to the MixRoute console or your API provider console if you are using a different one.
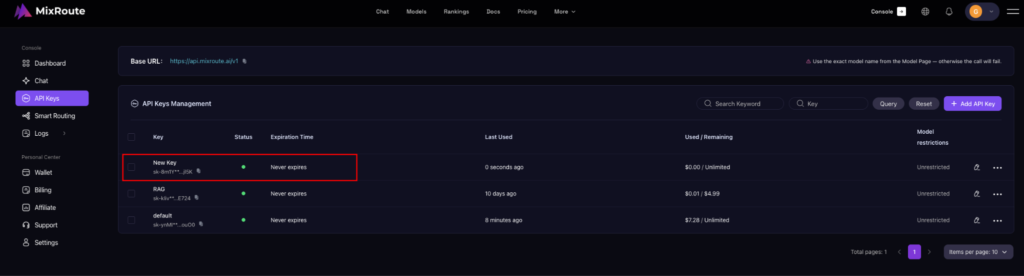
Now don’t store this anywhere in files yet. We are going to store it directly in AWS Secrets Manager.
Store the keys in Secrets Manager
Open the AWS console and go to Secrets Manager. Make sure you are in the same region as your EC2 instance, then click Store a new secret.
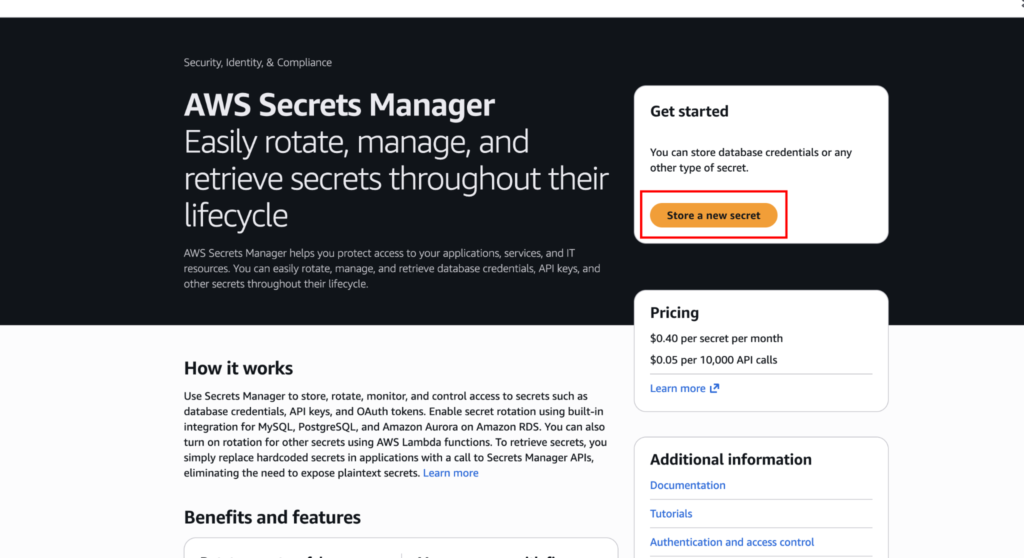
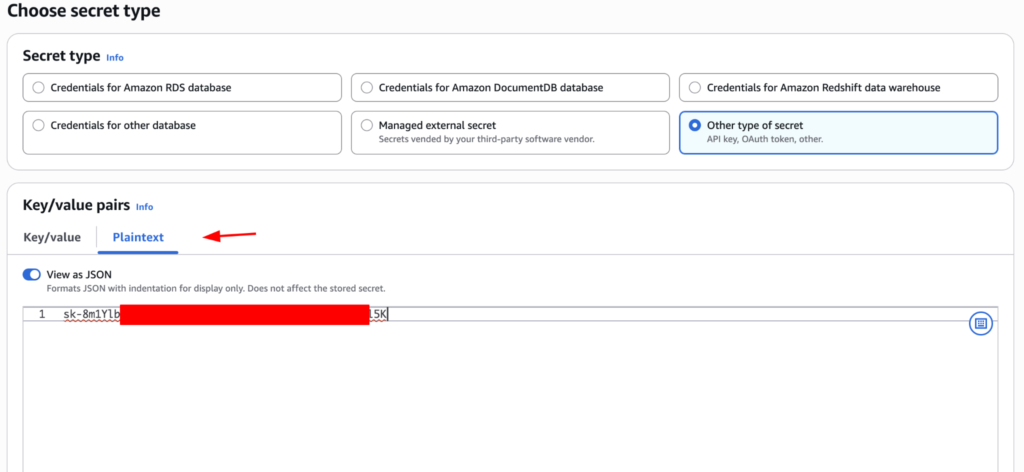
Select Other type of secret. Switch to the Plaintext tab, delete the sample text, and paste only your new API key.
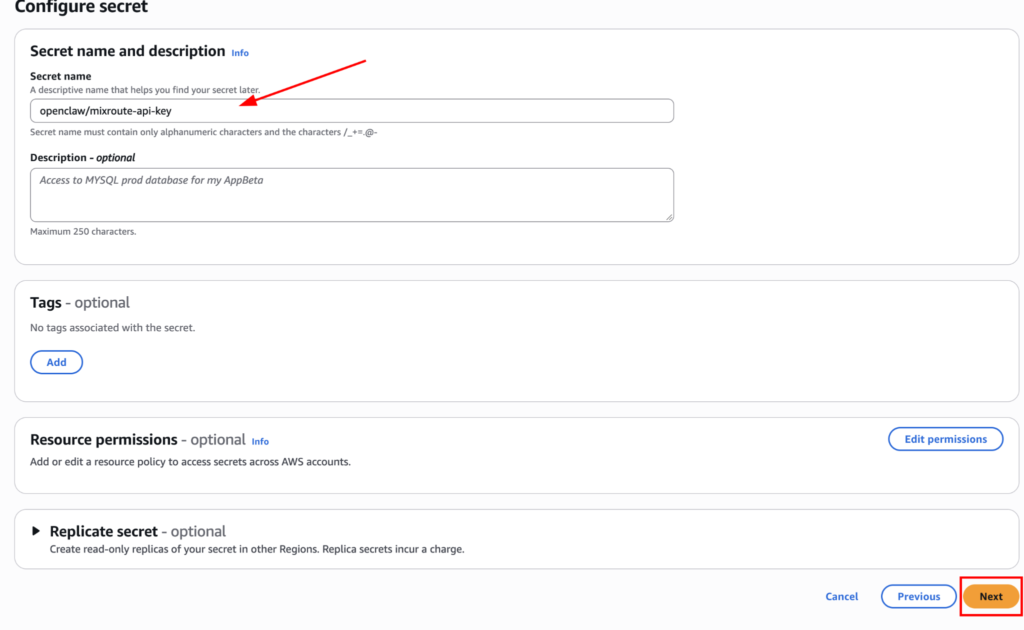
Click Next, and name the secret openclaw/mixroute-api-key. Keep everything else default, click through the remaining steps, and click Store.
Now do the same cleanup and rotation with Brave Search Key, and name it openclaw/brave-api-key.

Note: Secrets Manager is not free. Each secret costs about $0.40 per month, plus a small charge per API call. Check the AWS pricing page for current rates.
Create an IAM role for the instance
Now we need to allow our instance to use these secrets. For that, we need to create an IAM role. Go to IAM > Roles and click Create role.
Choose AWS service for the trusted entity type, pick EC2 for your use case, and hit Next. You can pass through the initial permissions screen by pressing Next. Set the role name to openclaw-secrets-reader, and select Create role.
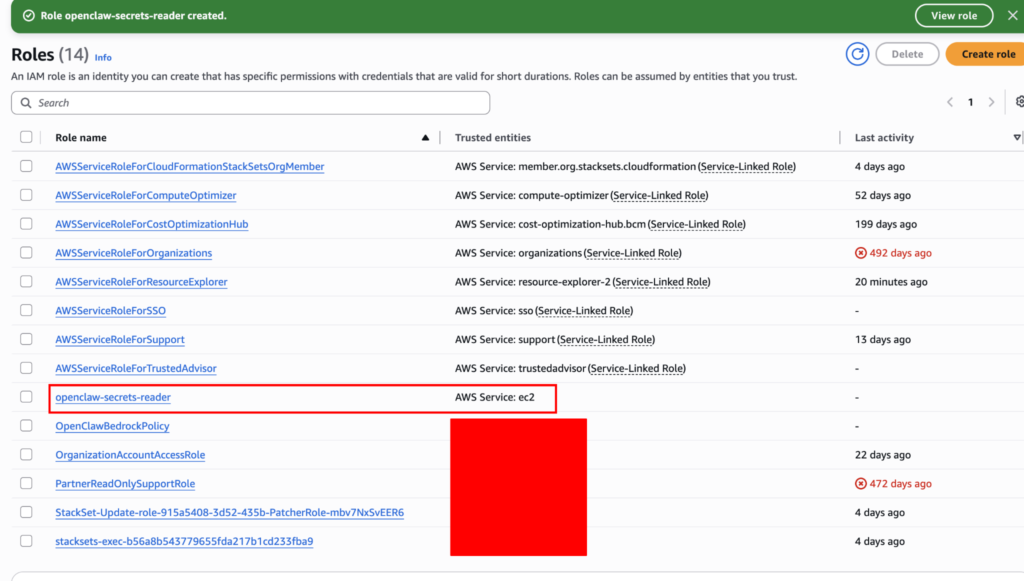
Select the new role, then click Add permissions > Create inline policy. Head over to the JSON tab and paste this policy inside. Make sure to swap out REGION and ACCOUNT_ID with your actual details.
{

  "Version": "2012-10-17",

  "Statement": [

    {

      "Effect": "Allow",

      "Action": "secretsmanager:GetSecretValue",

      "Resource": "arn:aws:secretsmanager:REGION:ACCOUNT_ID:secret:openclaw/*"

    }

  ]

}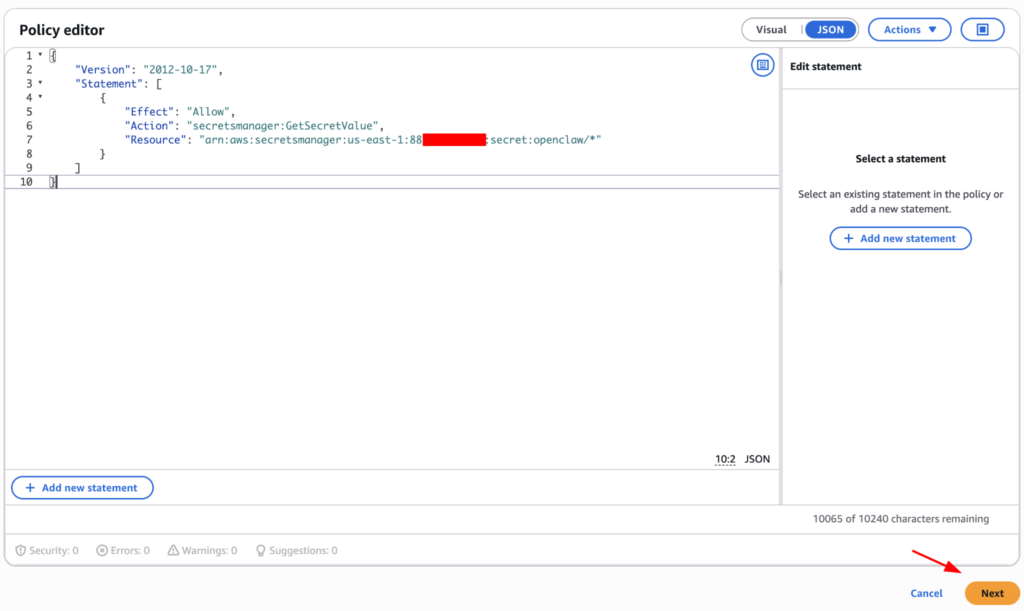
This allows the role to read only secrets whose names start with openclaw/. It can’t read anything else in your account, and it can’t change or delete secrets. Name the policy openclaw-read-secrets and save it.
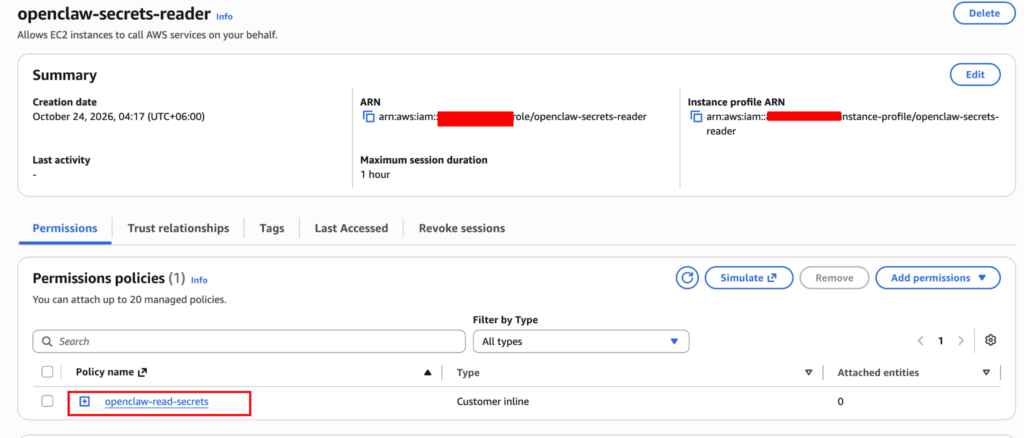
Now attach the role to the instance. Go to the EC2 dashboard, select your instance, and choose Actions > Security > Modify IAM role. Select openclaw-secrets-reader and click Update IAM role.
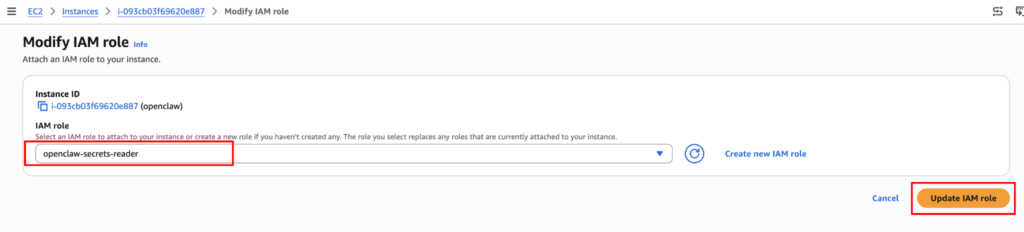
Now we have to install the AWS CLI or add an SDK script. We will go with the AWS CLI here.
Install the AWS CLI
OpenClaw will use the AWS CLI to fetch the keys. For security, OpenClaw only runs secret commands that belong to the current user, so we install the AWS CLI in our home folder instead of system-wide.
sudo apt install -y unzip

curl "https://awscli.amazonaws.com/awscli-exe-linux-x86_64.zip" -o awscliv2.zip

unzip -q awscliv2.zip

./aws/install -i ~/.local/aws-cli -b ~/.local/bin

rm -rf aws awscliv2.zip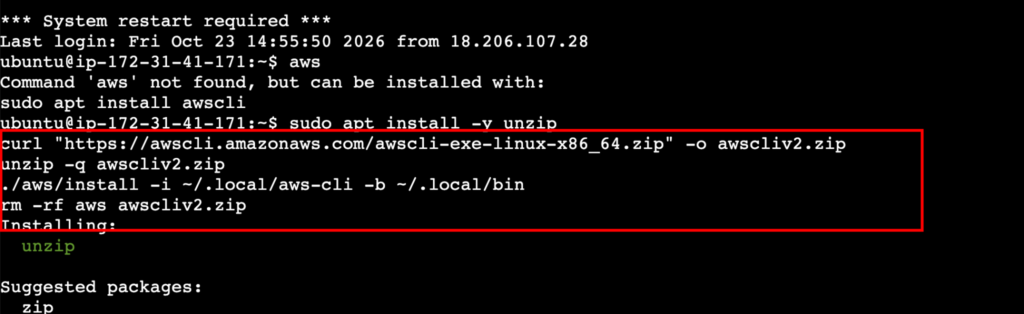
Test that it can read a secret using the IAM role. This prints only the length of the key, so the key itself never appears on screen. Replace REGION with your region, for example, us-east-1.
~/.local/bin/aws secretsmanager get-secret-value \

  --secret-id openclaw/mixroute-api-key \

  --query SecretString --output text \

  --region REGION | wc -c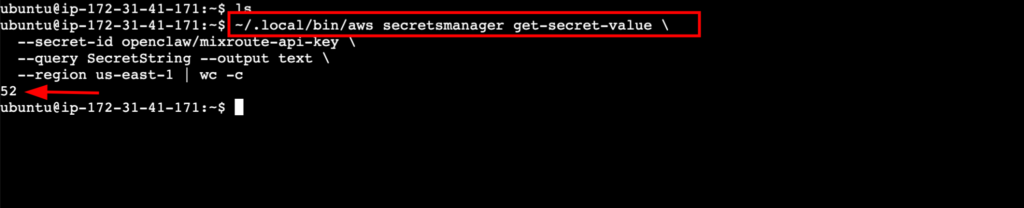
We can see a number; this means it works. If you see an error, check that the IAM role is attached to the instance and that the region is correct.
Connect OpenClaw to Secrets Manager
Open the OpenClaw config file with vim ~/.openclaw/openclaw.json. And before the “models” block, add the following. Replace REGION with your region in both places.
"secrets": {

    "providers": {

      "aws_mixroute": {

        "source": "exec",

        "command": "/home/ubuntu/.local/bin/aws",

        "args": ["secretsmanager", "get-secret-value", "--secret-id", "openclaw/mixroute-api-key", "--query", "SecretString", "--output", "text", "--region", "REGION"],

        "jsonOnly": false

      },

      "aws_brave": {

        "source": "exec",

        "command": "/home/ubuntu/.local/bin/aws",

        "args": ["secretsmanager", "get-secret-value", "--secret-id", "openclaw/brave-api-key", "--query", "SecretString", "--output", "text", "--region", "REGION"],

        "jsonOnly": false

      }

    }

  },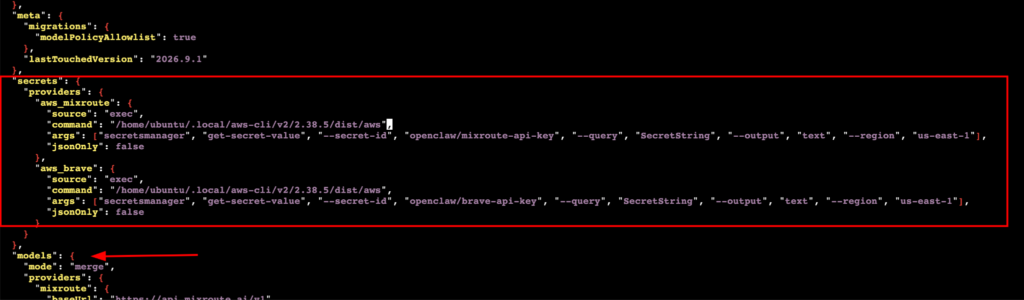
Each provider runs one AWS CLI command that returns one key. jsonOnly: false tells OpenClaw to accept the plain text output as the key.
Next, find the MixRoute provider from Part 1 and replace the apiKey line: "apiKey": "${MIXROUTE_API_KEY}", with "apiKey": { "source": "exec", "provider": "aws_mixroute", "id": "value" },.

Now save the file and validate with openclaw config validate.

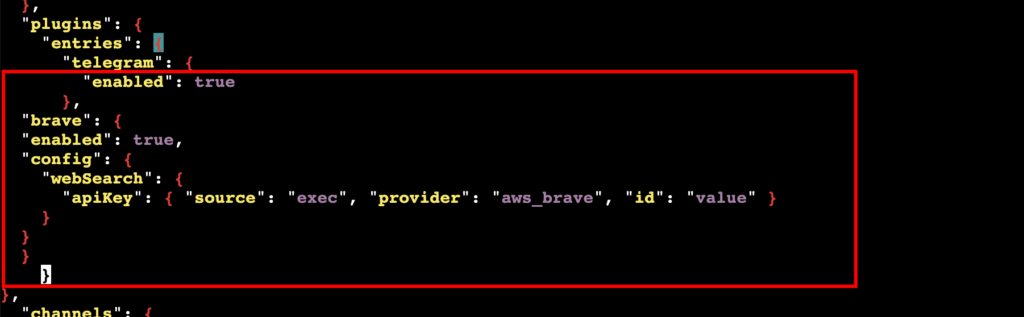
For the Brave key, open the config file again. And find the Brave entry in the plugins block. Right now it looks like this.
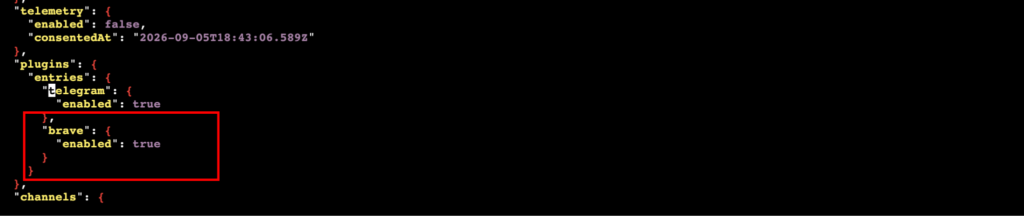
Change it to this:
"brave": {

  "enabled": true,

  "config": {

    "webSearch": {

      "apiKey": { "source": "exec", "provider": "aws_brave", "id": "value" }

    }

  }

}

}

}
Save the change and validate it with openclaw config validate.

Then delete BRAVE_API_KEY from ~/.openclaw/.env. This matters: Brave can read its key from either the BRAVE_API_KEY environment variable or this config field. If the old line stays in .env, you can’t be sure which key OpenClaw is using. Also remove the MIX_Route API key.
Now reload the secrets and restart the gateway.
openclaw secrets reload
openclaw gateway restart
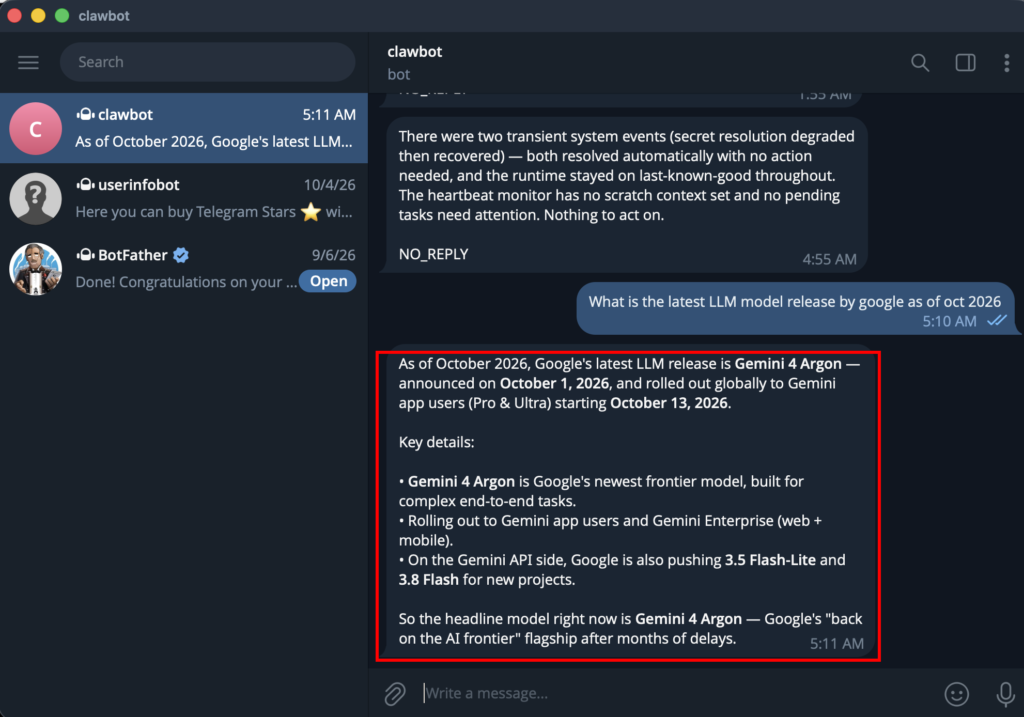
Now send a message to the Telegram bot and ask something recent that would need a web search. If both work, OpenClaw is fetching both keys from Secrets Manager.
Finally, check for any secrets still stored in plain text with openclaw secrets audit.

You can follow the same process for the Telegram bot token as well.
Step 5: Lock Down the EC2 Instance
Now that we’ve taken care of the secrets, lets tighten the EC2 security.
Check that the gateway is not exposed
Telegram works by OpenClaw reaching out to Telegram, so the gateway doesn’t need to be reachable from the internet. Check this with the command sudo ss -tlnp | grep 18789.

You should see 127.0.0.1:18789 (and [::1]:18789), which means the gateway is only reachable from the server itself. Never open port 18789 in your security group.
Restrict SSH
Right now our EC2 instance allows SSH over any IP address. Meaning anyone can try to connect (Obviously it would require the SSH key). But it’s better not to allow anyone to connect at all.
You can either allow your own IP address or choose Instance Connect if you connect over a browser. I’d recommend you choose the instance connect.
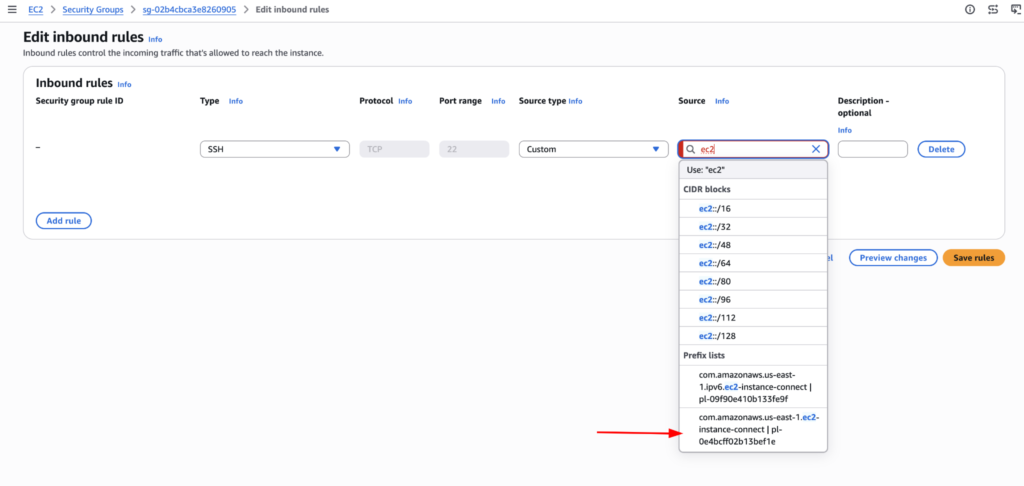
Save the rule when the change is done.
Best Practices
- Keep the allowlist small. Only allowlist read-only commands or ones you fully trust. Never allowlist scripts OpenClaw can edit, or interpreters like bash or python3.
- Treat web content as untrusted. Web pages can contain text meant to trick AI agents. The allowlist limits what a tricked agent can do.
- Review skills before installing. Read the SKILL.md of anything from ClawHub first.
- Audit after changes. Run openclaw security audit and openclaw secrets audit after every config change or update.
Clean Up
Once you’re done testing, terminate the EC2 instance, then delete the secrets in Secrets Manager and the openclaw-secrets-reader IAM role. Delete the bot with /deletebot in @BotFather, and revoke your API keys.
Conclusion
Our OpenClaw setup is now a lot more secure. Only our account can talk to it; it runs only the commands we approved; the API keys live in AWS Secrets Manager, and the server is closed to the outside. Every new skill or command changes what OpenClaw can do, so keep the allowlist small and run the audit regularly.